How to Build a Garage Golf Simulator: Step-by-Step Setup Guide
Build the room in the right order: measure the garage, choose the simulator path, position the golfer and launch monitor, install the mat and ball containment, then add the screen, projector, software, lighting, and finishing details only when the foundation works.
The best way to build a garage golf simulator
The best way to build a garage golf simulator is to start with your space, not the equipment. Measure your garage, test your swing, choose whether you want a net or impact screen, decide on a launch monitor type, then build the hitting area around safety, comfort, and how you will actually practice.
Confirm the garage can support the setup before choosing products.
Measure from the finished hitting surface—not the bare concrete—and test the actual golfer’s driver swing. Mark the screen or net, ball position, launch-monitor zone, projector path, and walking route with painter’s tape.
Garage golf simulator build checklist
A garage simulator has more moving parts than most people expect. Use this checklist before buying anything.
Measure
Check ceiling height, depth, width, garage rails, openers, lights, shelves, and your real swing clearance.
Contain
Choose a hitting net, impact screen, side netting, ceiling protection, and safe ball-stopping setup.
Measure Shots
Pick a launch monitor that fits your space, budget, indoor limitations, and practice goals.
Improve
Add software, practice routines, games, projector/display, turf, storage, and upgrades over time.
Pick the simulator type before selecting individual products.
The correct build depends on whether the garage must remain flexible, whether a projector is necessary, and how much depth is available for the launch monitor. Start with the simplest setup that satisfies the real practice goal.
| Build Path | Best For | Core Equipment | Add Later | Main Constraint |
|---|---|---|---|---|
| Portable practice station | Shared garage, renters, first setup | Mat, net, phone or tablet, basic safety protection | Launch monitor, better mat, side net, lighting | Repeated setup and safe storage |
| No-projector simulator | Serious practice without a screen bay | Mat, net, launch monitor, TV or tablet, software | Flooring, side protection, lighting, computer | Monitor spacing and display placement |
| Projected simulator | Immersive rounds and entertainment | Mat, monitor, impact screen, enclosure, projector, computer | Turf, sound, seating, storage, lighting control | Room depth, projector geometry, and containment |
| Premium finished bay | Permanent high-use simulator room | Premium monitor, enclosure, projector, PC, turf, lighting, ventilation | Seating, audio, storage, decor, cameras | Total project cost and room-quality balance |
Four products that illustrate the phased build approach
These are examples of useful roles inside a garage build—not a claim that every golfer should buy the same four products. Choose the room and build path first, then verify that each component fits the final layout.
GoSports Elite Golf Mat
A full-stance value mat for establishing the hitting position and testing the room before building around it.
GoSports Practice Hitting Net
A lower-cost portable net for the first practice station, with additional side and ceiling protection added as the room requires.
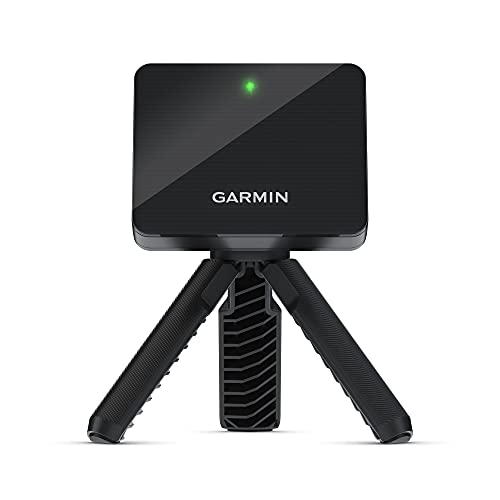
Garmin Approach R10
A portable radar launch monitor for golfers with enough indoor depth who also value outdoor use and simulator software options.
GoSports Simulator Enclosure
A complete screen-and-enclosure path when the garage is ready for a dedicated projected simulator.
A practical starter mat for garage golfers who need a repeatable hitting surface without moving immediately into a premium mat. It works with nets, launch monitors, and basic simulator setups.

A budget-friendly practice net for golfers building their first garage mat-and-net station. It is a practical starting point for basic indoor practice and portable launch-monitor use, but buyers should confirm the selected size and plan additional protection for side misses and high shots.

Our top starter pick for garage golfers with enough depth for a radar-based setup. It is portable, simulator-capable, and a strong value for mat-and-net practice without immediately building a premium simulator bay.
A complete golf simulator enclosure kit for buyers who want the frame, impact screen, side and top containment, and internal frame padding organized as one system. It is the strongest starting point for a dedicated projected garage bay, but the selected enclosure size and complete room footprint must be measured carefully.

Measure your garage before buying anything
Start with the actual usable space, not the wall-to-wall dimensions. Garage door rails, openers, ceiling lights, shelves, storage racks, steps, water heaters, workbenches, and parked cars can all reduce the space you can use for golf.
Ceiling Height
Many golfers want around 9 feet as a workable minimum, while 10 feet is a much better target for driver swings and taller golfers.
Room Width
A narrower garage can work for one golfer, but 12–15 feet gives more comfort, better side protection, and more flexibility.
Room Depth
Depth affects launch monitor choice, ball-to-screen distance, screen buffer, and backswing room. Full builds often feel better around 15–18+ feet.
Measure twice, buy once
Before ordering a simulator package, put tape on the floor for your hitting position and screen/net location. Then make slow swings with wedge, 7-iron, hybrid, and driver. If you change your swing to avoid the ceiling or walls, the space may technically fit but still feel wrong.
Free Measurement & Planning Worksheet
Save your measurements before you start buying parts.
Step 1 is the foundation of the entire build. Use the free worksheet to record the finished room dimensions, obstructions, hitting position, launch-monitor zone, and ball-capture space before moving on to the layout.
- Measure from the finished mat height—not bare concrete
- Record garage-door rails, opener, lights, beams, and storage
- Mark the planned hitting position and full swing zone
- Keep the worksheet beside you while choosing every component
Enter your email to get the worksheet plus a short garage-planning email series. Unsubscribe anytime.
Choose the best garage golf layout
Your layout depends on whether the setup is permanent or portable, whether cars still need to fit in the garage, and whether you want a simple practice station or a full simulator room.
Typical garage simulator layout
Most builds include a screen or net zone, a hitting zone, and space behind the golfer or launch monitor.
Mat + net setup
Best for renters, shared garages, low budgets, and golfers who still need to park cars. This is the easiest way to start.
Mat + net + launch monitor
A strong middle ground. You get real practice value without committing to a full screen, projector, and enclosure.
Screen + projector bay
Best for golfers who want simulated rounds, entertainment, and a polished room. This takes more planning and more budget.
Choose a hitting mat you will actually want to use
The hitting mat is one of the most important parts of the build because it affects feel, comfort, injury risk, tee use, stance height, and how much you enjoy practicing. A cheap mat can make the setup feel worse even if the launch monitor is good.
What to look for
- Enough thickness and shock absorption for repeated swings
- A realistic hitting strip or hitting surface
- Room for both stance and ball position
- Works on concrete garage floors
- Compatible with real tees, rubber tees, or tee holders
What to avoid
- Thin mats placed directly on concrete
- Hard surfaces that punish fat shots
- Tiny strips that force awkward stance positions
- Mats that slide during swings
- Buying only by price instead of feel and durability
Decide between a hitting net and an impact screen
A hitting net is the best starting point for many garage golfers. An impact screen is better when you want a full simulator experience with projected courses, but it requires more planning, more space, and better side protection.
Hitting net
A net is cheaper, easier to move, easier to store, and better for testing whether you will actually practice at home consistently.
- Lower cost
- Good for mat + launch monitor practice
- Portable options available
- Does not require a projector
Impact screen
A screen gives you the full indoor simulator experience. It works best with an enclosure, projector, side protection, and enough buffer space.
- Works with projected courses
- Looks more polished
- Better for entertainment
- Requires more careful installation
Choose a launch monitor that fits your garage
The launch monitor is the brain of the simulator, but the best model depends heavily on your garage depth. Radar units can be affordable and portable, but they usually need more total room depth. Camera-based units are often easier to fit in tighter indoor spaces.
| Launch Monitor Type | Best For | Garage Consideration | Examples |
|---|---|---|---|
| Radar behind the ball | Budget practice, portable indoor/outdoor use | Needs room behind the ball and enough ball flight into the net or screen. | Garmin R10, Rapsodo MLM2PRO, FlightScope Mevo-style units |
| Camera/photometric near the ball | Shorter garages and indoor simulator use | Often easier when total depth is limited. | SkyTrak, Bushnell Launch Pro, Foresight GC3, Uneekor EYE MINI line |
| Overhead indoor systems | Dedicated simulator bays | Cleaner hitting area, but needs mounting, planning, and higher budget. | Trackman iO, Uneekor overhead systems |
Choose radar if…
- You have enough total garage depth
- You want portability
- You want to practice indoors and outdoors
- You are building a lower-cost starter setup
Choose camera-based if…
- Your garage depth is limited
- You care most about indoor simulator use
- You want a more permanent garage setup
- You are willing to spend more for indoor fit
Add a projector, TV, tablet, or laptop display
You do not need a projector to start practicing. A tablet, phone, laptop, or TV can be enough for a launch monitor practice station. A projector becomes important when you want the full simulator experience with courses displayed on an impact screen.
Phone or tablet
Best for simple practice sessions, launch monitor apps, limited budgets, and portable setups.
TV or monitor
Good if you want a larger display without mounting a projector or installing a full impact screen.
Projector
Best for a dedicated simulator bay with an impact screen, enclosure, simulator software, and a more immersive feel.
Make the garage simulator safe
Safety matters more in a garage than in a finished simulator studio. Garages often have concrete floors, tools, shelves, cars, hard walls, windows, garage doors, ceiling tracks, and storage areas. Real golf balls can do real damage.
Protect the sides
Add side netting, curtains, or enclosure panels to catch shanks and mishits. Do not assume every shot will fly straight into the screen.
Protect the ceiling
High wedge shots and sky balls can hit garage ceilings, openers, tracks, and lights. Consider ceiling baffles or netting if needed.
Control bounceback
Screens and nets need proper spacing, tension, and backing. Too tight or too close to a hard wall can increase bounceback risk.
Clear the floor
Remove clutter, cords, tools, buckets, storage boxes, and anything that could trip you during the swing or follow-through.
Think about people
Keep kids, pets, and guests behind the hitter. A simulator room is still a room where golf clubs and golf balls are moving fast.
Start slow
Test the setup with short swings and slower shots before hitting full-speed drivers or wedges into the screen.
Plan power, cables, lighting, heat, airflow, and everyday usability.
A simulator can fit physically and still be unpleasant to use. Plan the supporting systems before the walls, turf, seating, and trim make changes harder.
Power and circuits
Confirm safe outlet locations and the combined needs of the computer, projector, monitor, display, lighting, heaters, fans, and accessories.
Cable routing
Protect HDMI, USB, Ethernet, extension cords, and power cables from feet, clubs, carts, cars, and the garage door.
Lighting control
Keep the golfer and ball visible without shining bright light directly onto the impact screen or launch-monitor cameras.
Heat and ventilation
Projectors, gaming computers, people, and summer garages generate heat. Provide safe airflow without blowing directly through the hitting zone. See our garage golf simulator ventilation and safety guide for airflow, carbon monoxide awareness, humidity control, heater safety, and electronics protection.
Noise and neighbors
Impact noise, club strikes, projector fans, speakers, and late-night use may require absorption, isolation, or operating-hour limits.
Storage and reset time
Give clubs, balls, tees, remotes, chargers, alignment tools, and folded equipment a dedicated home so the room stays usable.
Garage golf simulator build costs
You can build a useful garage golf practice space at several budget levels. The key is matching expectations to the setup.
Basic practice setup
$500–$1,500Mat, net, basic launch monitor or practice tools, phone/tablet display, and simple garage safety setup.
Launch monitor setup
$1,500–$3,500Better mat, stronger net, launch monitor, app/software, lighting, and basic display setup.
Screen simulator
$3,500–$8,000Quality launch monitor, impact screen, projector, enclosure, hitting mat, software, and better room protection.
Finished simulator bay
$8,000–$20,000+Premium launch monitor, full enclosure, projector, PC, turf, lighting, sound, seating, storage, and room finishing.
The smartest way to upgrade over time
You do not need to buy every piece on day one. For many golfers, the smartest build is a phased setup that improves as they confirm they actually use it.
| Phase | What to Add | Goal |
|---|---|---|
| Phase 1 | Mat, net, basic safety protection | Confirm the space works and you enjoy practicing at home. |
| Phase 2 | Launch monitor and phone/tablet display | Start tracking carry, ball speed, launch, spin, shot shape, and consistency. |
| Phase 3 | Better mat, stronger net, side protection, lighting | Make the setup more comfortable, safer, and easier to use often. |
| Phase 4 | Impact screen, projector, enclosure, simulator software | Turn the practice station into a true simulator experience. |
| Phase 5 | Turf, storage, seating, sound, heating/cooling, finishing touches | Create a polished garage golf room you actually want to spend time in. |
Garage golf simulator build mistakes to avoid
Buying before measuring
Product bundles cannot fix a ceiling, depth, width, track, opener, or swing-clearance problem.
Using bare-floor dimensions
The mat, platform, turf, and padding change the finished hitting height and usable ceiling clearance.
Designing only for center hits
Shanks, pop-ups, low shots, frame strikes, ricochets, and left-handed users need real containment planning.
Choosing the projector too early
The screen opening, aspect ratio, hitting position, room depth, and mount zone should determine projector fit.
Ignoring monitor requirements
Radar, camera-based, and overhead systems need different spacing, alignment, mounting, power, and lighting.
Overspending on finishes first
Prioritize the mat, containment, monitor fit, computer, and safety before seating, trim, decor, or premium turf.
Forgetting cables and heat
Long video runs, gaming computers, projectors, chargers, heaters, and summer garages need early planning.
Making a shared garage permanent
Cars, storage, doors, tools, and household access may make a foldaway or no-projector setup the better design.
Testing with full driver swings first
Start with short shots and increase speed gradually while checking the net, screen, frame, padding, and bounceback.
Garage golf simulator build FAQs
Can I build a golf simulator in my garage?
Yes, many golfers build simulators in garages. The key is making sure you have enough swing clearance, ceiling height, depth, ball containment, and safe space around the hitting area.
What is the cheapest way to build a garage golf simulator?
The cheapest practical path is a mat, hitting net, and basic launch monitor or practice app. You can use a phone or tablet display instead of a projector and upgrade later.
Do I need a projector for a garage golf simulator?
No. A projector is only needed if you want the full screen-based simulator experience. Many golfers start with a net and tablet, laptop, or TV display.
Is a net or impact screen better?
A net is usually better for a starter or budget setup. An impact screen is better for a full simulator with projected courses, but it requires more planning and more space.
How much space do I need for a garage golf simulator?
A comfortable target is around 10 feet high, 12–15 feet wide, and 15–18 feet deep. Smaller setups can work, especially with camera-based launch monitors, but you need to test your actual swing.
What should I buy first?
Measure your garage first. After that, start with a good hitting mat and safe ball containment. Then choose a launch monitor that fits the space you actually have.
The build order is based on dependencies—not product price.
Golf Garage Guide does not claim hands-on product testing unless it has actually occurred. This guide prioritizes the decisions that constrain every later purchase: usable room dimensions, real swing clearance, hitting position, containment, launch-monitor technology, screen opening, projector geometry, power, lighting, ventilation, and how the garage must function outside golf.
Related garage golf guides
Use these hubs to choose the room, equipment, containment, projection, and budget before committing to the final build.
Manufacturer references used for example-product checks
Start simple. Build safely. Upgrade only when it makes sense.
The best garage golf simulator is not always the most expensive one. It is the setup that fits your space, feels safe, gets used often, and helps you practice more consistently at home.